On grade concrete is tricky. The proper thing to do is to test what the concrete is emitting for moisture vapors.
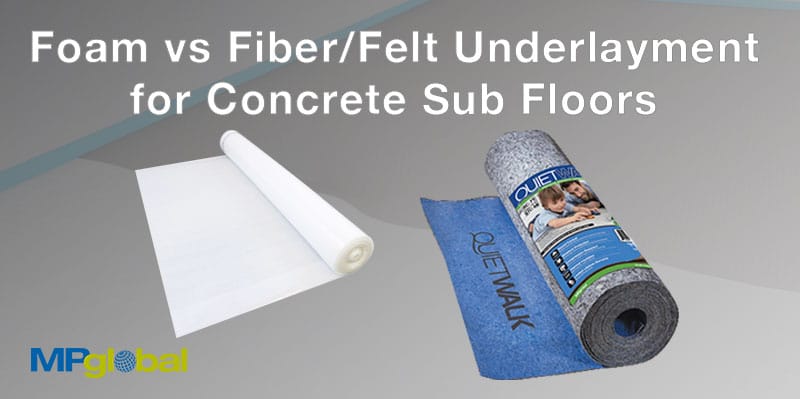
Find the suitable floor underlayment that will perform to those emissions. Foam underlayment is made from resin/petroleum based products which will block moisture inherently.
Fiber/Felt Underlayment is made from recycled materials and will help the concrete breathe those vapors instead of just blocking them helping to inhibit mold and mildew situations. It manages moisture and will not allow moisture to pool under the blocker like foam. Pull back a welcome mat once on the stoop, moisture is there as the mat was blocking the emissions and allowing them to accumulate into water.
Join Our Newsletter
You are about to install your new flooring. As you lay the first plank you realize that
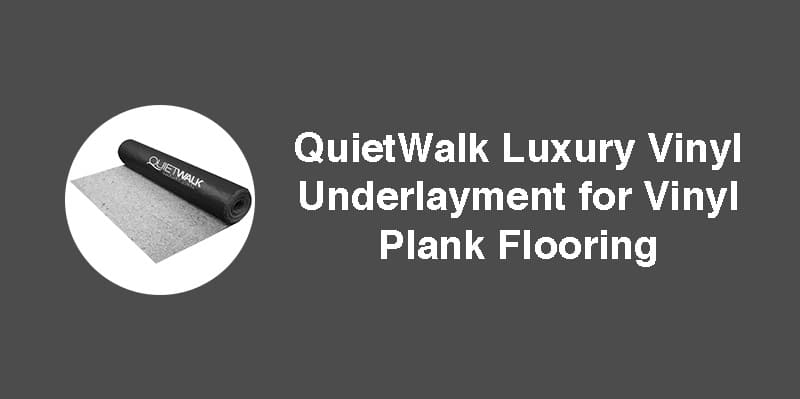
With the rise of vinyl plank flooring, MP Global Product introduces the first felt underlayment designed for vinyl plank flooring. With density in mind, we tweaked the fiber formula from our other popular QuietWalk for laminate flooring. Same benefits as the famous QuietWalk, just thinner/denser which eliminates movement when walking on vinyl plank flooring.
We’ve heard of other underlayment causing compression issues once they installed their LVP. This was due to the underlayment having to much “compression”. It can be costly for DIY or contractors to rip up the old flooring.
Join Our Newsletter
You are about to install your new flooring. As you lay the first plank you realize that
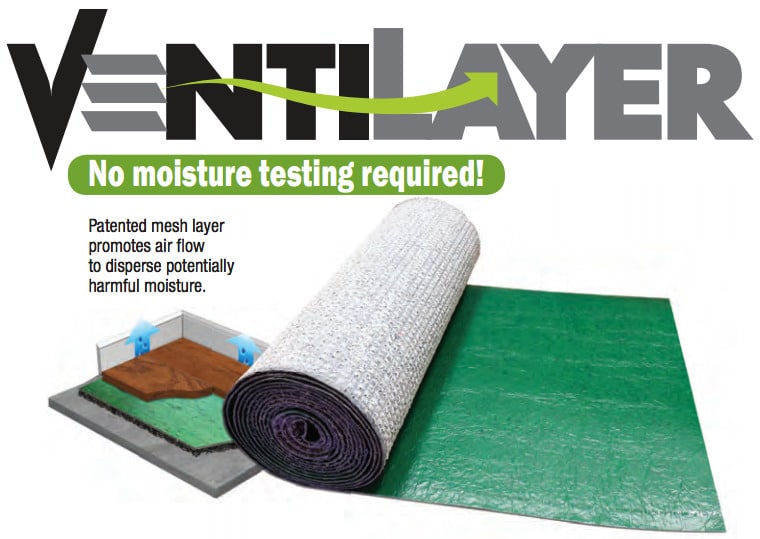
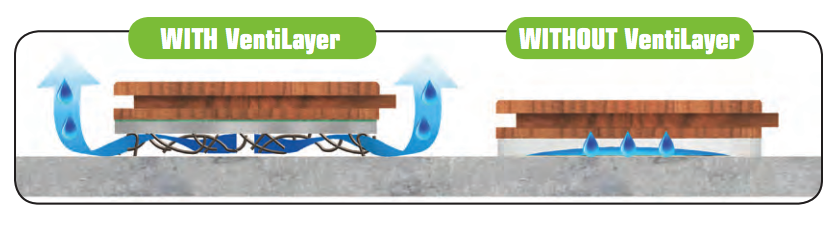
Installing any type of flooring in the basement can be tricky. With common humidity levels that are associated with basements, you want to make sure your flooring gets plenty of ventilation.
We developed VentiLayer/Bellawood Basement to help just that. Our patented mesh layer promotes ventilation to disperse potentially harmful moisture away from your beautiful flooring.
Underlayment for Concrete Basement Floors
The best basement underlayment protection for floating laminate and engineered hardwood flooring.
Strong, flexible mesh layer elevates the pad and promotes ventilation so moisture doesn’t become trapped
Helps protect the floor from moisture damage and inhibits mold growth
Provides added insulation
Cushions the floor, absorbs sound, and helps make laminate floors sound more like real wood
A green product; made with recycled content
No off-gassing from Volatile Organic Compounds (VOCs)
Basement Underlayment Installation Instructions
Be sure the subfloor surface is clean and dry
If required, level the floor with self leveling concrete compound or Pre-Mixed Floor Patch, fill in cracks larger than 1/6″. All wood and concrete subfloors must be flat within 1/8″ over a 6 foot span, or 3/16″ over a 10 foot span. All areas must be check prior to installation.
Roll Bellawood Basement underlayment over the subfloor with the vapor barrier film facing up and the attached plastic mesh facing down to the subfloor.
The perimeter edges of the underlayment need to be 1/2 to 3/4 inches away from the wall.
Seams need to be butted together flush, do not overlap the pad. Tape the seams with a good quality duct tape.
Install floating engineered wood or laminate flooring according to the manufacturer’s installation instructions.
It is recommended that the flooring planks be laid opposite direction to the seams of the underlayment whenever possible.
Allow 1/4″ clearance between the drywall and finished floor.
Leave baseboards up off finished floor a minimum of 1/16″ to 1/8″ for air circulation.
Understanding what goes under your laminate flooring can help improve the life of your flooring. Of course, this really never gets talked about because the flooring is what you look at, feel and admire. What isn’t talked about is underlayment. Underlayment helps moisture protection, sound absorption and compression support.
Do you really need underlayment for laminate flooring?
Yes, proper underlayment and subfloors allows minimal wear and improve stability of any flooring. Without underlayment, click and lock mechanism can fail over time and give your floor an unlevel floor.
How does laminate flooring underlay work?
Underlayment works by providing the following benefits:
1. Moisture Protection
Fiber underlayment works by absorbing moisture/water vapors from your subfloor. The open gutter of the outer perimeter of the underlayment evaporates the vapors. With the built-in vapor barrier (film facing up), the moisture will never touch the laminate.
2. Sound Absorption
Another benefit is the fiber underlayment provides a fuller sound when walking on. Also dampens the sound from impact or sound transmission noises from other rooms.
3. Improved Subfloor Minor Imperfections
While laying out the underlayment, it can cover the small imperfections your floor has and makes your floor look nice and even. If your subfloor is uneven, your flooring can potentially buckle or sound like “rice krispies popping” when walking on.
What are all the sizes of underlay for laminate flooring?
There is a lot of variations between sizes. Some come in 100 sq ft rolls – 3′ x 33.4′ or 360 sq ft – 6′ x 33.4′. Some other size can be 48″ x 25′ or 48″ x 150′.
Does price really make a difference with underlayment?
Yes, it does make a difference with underlayment.
Foam underlayments is like buying a bicycle. cfiber/felt underlayment is like buying a cadillac.
Foam underlayment is essentially trapped air in tiny bubbles. The issues is over time with high traffic areas, the air is released/popped and never returned to is original form.
Fiber/Felt underlayments however provide that compression rebound so your floor never looks/feels flat.
Join Our Newsletter
You are about to install your new flooring. As you lay the first plank you realize that
Have you recently bought some bamboo flooring and looking for the best underlayment? Did you know what lies underneath your bamboo plays an even more important role or equal to?
Underlayment for bamboo can help you solve three hidden problems.
1. Moisture Protection
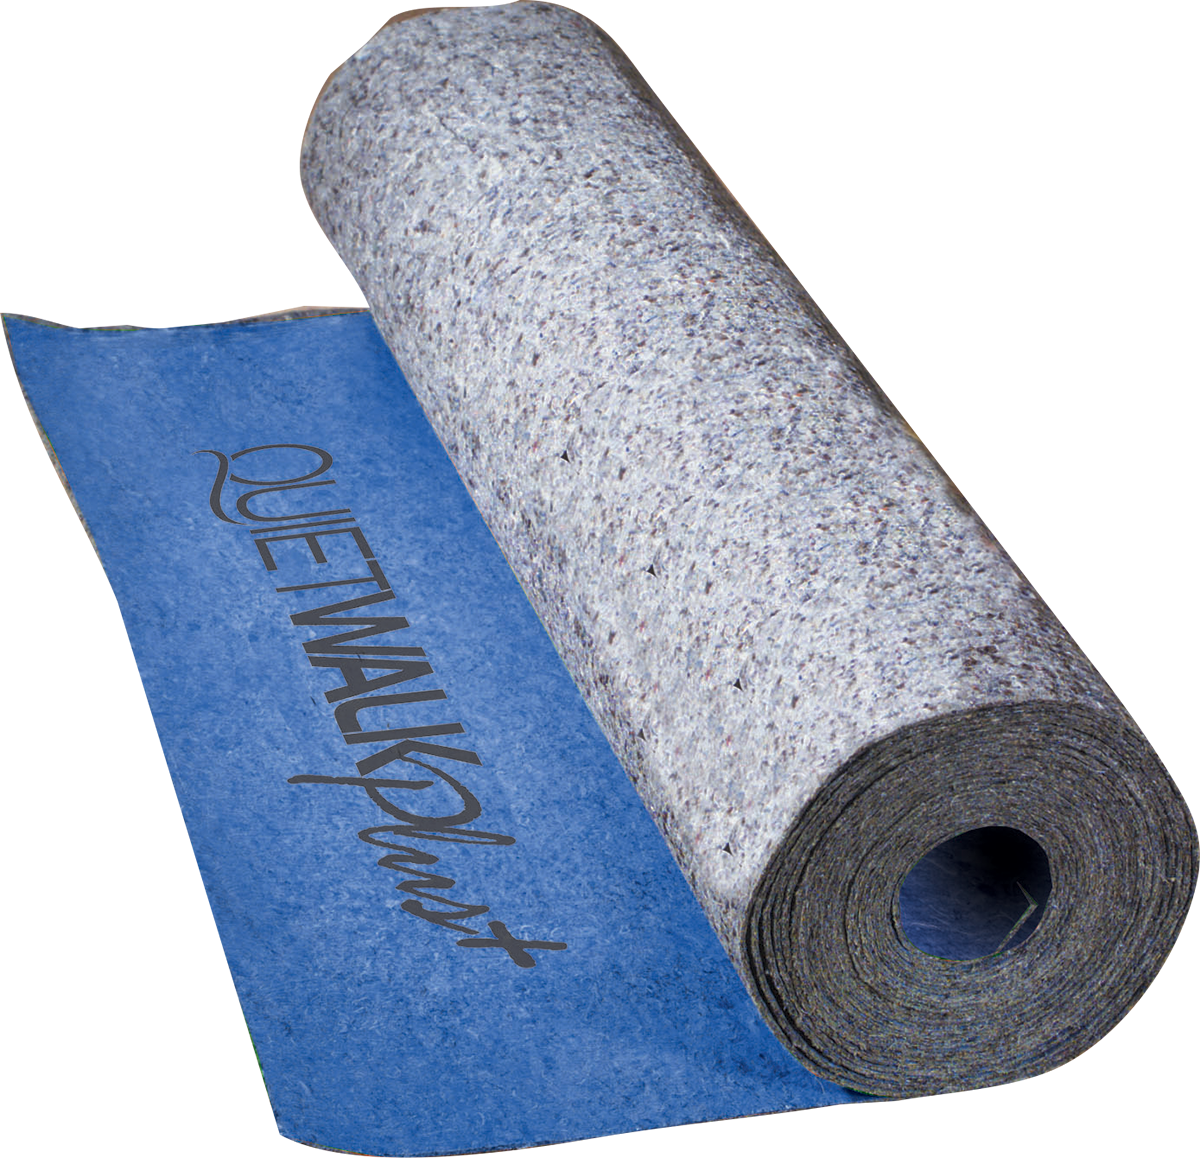
From talking to customers who had questions, bamboo flooring seems to be more prone to moisture. With QuietWalk Plus underlayment, it prohibits upto 5lbs of moisture per 24 hours. You can figure out the amount of pounds your subfloor is emitting by doing a calcium chloride test.
Most flooring installers won’t do a test but they lay down a 6 mil vapor barrier on top of the subfloor and under the bamboo/underlayment. The vapor barrier provides complete protection of moisture.
2. Sound Absorption
Another benefit is the fiber underlayment provides a fuller sound when walking on. Also dampens the sound from impact or sound transmission noises.
3. Improved Subfloor Minor Imperfections
While laying out the underlayment, it can cover the small imperfections your floor has and makes your floor look nice and even. If your subfloor is uneven, your flooring can potentially buckle or sound like “rice krispies popping” when walking on.
We offer QuietWalk Plus underlayment for bamboo flooring that provides all three benefits above. Not only that, but it is a recycled fiber that allows no VOCs.
Installing Heated Floors Under Your Tile Can Be Daunting
In this article, we will explain the major steps on installing our QuietWarmth Peel and Stick Radiant Heat Film for Tile and Glue-Down Flooring. Not only is QuietWarmth great for DIY consumers, but it is also budget friendly while offering heat for your family.
Installation Video:
To start you can view our full installation instructions by clicking on the following image.
Full Installation Guide
Preparing the Job Site
1. Ensure the job site is clean before working with the QuietWarmth® Peel & Stick Radiant Heat, free of any nails,
screws and other sharp debris that could damage the mats.
2. Tile flooring installations must meet subfloor requirements set forth by the Tile Council of North America (TCNA).
What You Will Need
QuietWarmth® Peel & Stick Radiant Heat mats
Thermostat: An approved thermostat
GFCI Breaker (if not part of the thermostat)
Junction Boxes: Minimum of two boxes required for each room or area. One box (2×4 inch) required for thermostat, one box (4×4 inch) required for electrical connections.
Tools: Digital ohm meter (multi-meter), wire stripper, screw driver, wood chisel, knife
Tile installation products (3/8” x 1/4” or greater plastic trowel, mortar, backer board, tile, etc.)
12/2 Romex
Electrical Installation
Step 1. GFCI Installation
QuietWarmth® Peel & Stick Radiant Heat mats must be protected by a Class A ground fault circuit interrupter (GFCI). This can be done either by the internal GFCI in the thermostat (as long as it directly controls the mat), or by a GFCI protected circuit breaker. Never double protect the circuit with a GFCI at the thermostat and at the circuit breaker box. Follow all local building and electrical codes. Typical Amperage Requirement: 120 VAC QuietWarmth: 0.1 amps per square foot, or 10 amps per 100 square foot of mat.
Step 2. Install Additional Power Modules
Depending on the amperage requirements of the mat(s), one or more secondary power modules may be required. A power module is a relay or non-controlling thermostat and must be treated as such. It allows the expansion of the controlled area that the main thermostat can control, but it must be placed on it’s own 20 amp dedicated circuit and do not load the thermostat control with more than 15 amps. The National Electrical Code specifics that each branch circuit used in conjunction with a heating system must be for the exclusive use of the heating system. Do not connect lights, outlets, etc. to any branch circuit used with the QuietWarmth Tile Heat.
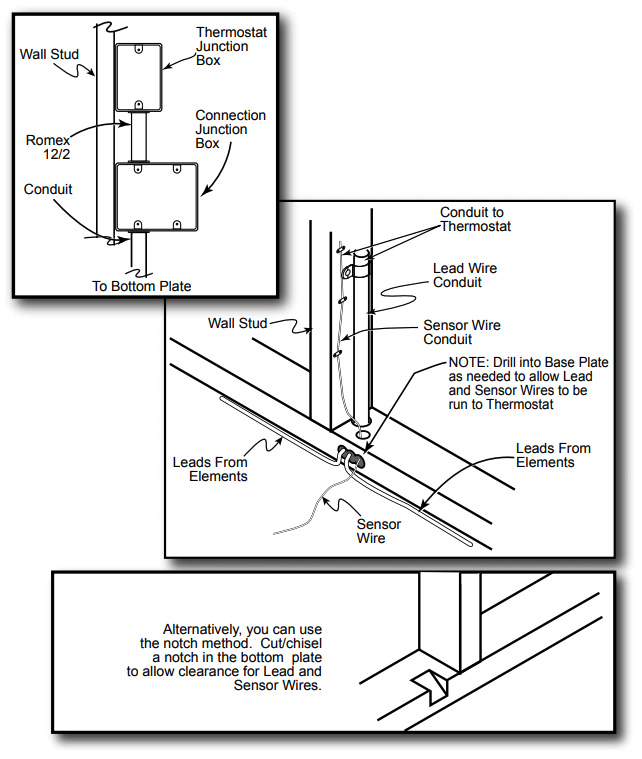
Step 3. Install Electrical Boxes
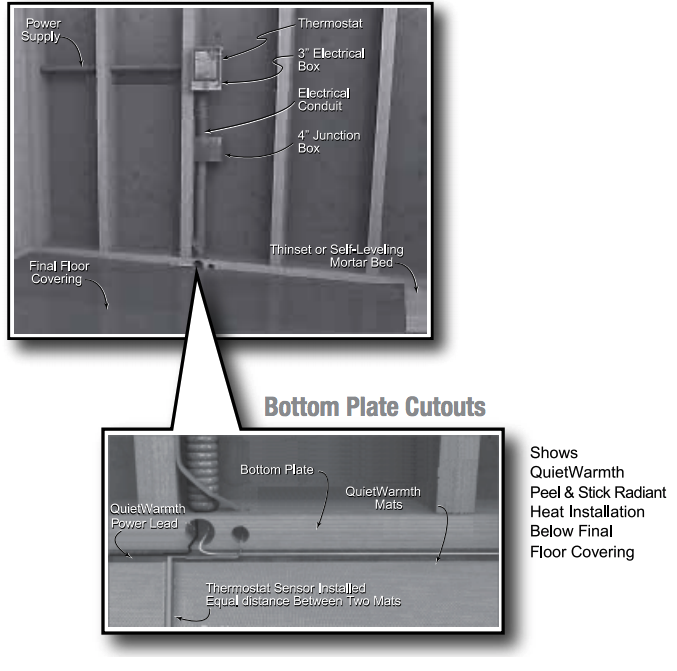
Install Junction box for the control device (thermostat) according to the manufacturer’s instructions. This box should be located, unobstructed, on an inside wall so that the device reads accurately.Install a 4×4 inch junction box for making electrical connections between the mats and thermostat.
Step 4. Bottom Plate Work
Drill or saw holes at the bottom plate. One hole is for routing power leads or conduit and the other is for the thermostat sensor. These holes should be directly below the electrical box(es). It is recommended that you drill or saw holes at the bottom plate. You may also use a notch technique as an alternative.
Step 5. Install Power Lead Conduit
Route the power leads from the thermostat down the wall cavity through opening in the bottom of plate to connect the mats.
Step 6. Install Thermostat Sensor
* if thermostat comes with floor sensor
A floor sensor comes with the recommended thermostat control. The sensor wire can be installed without a conduit or in a conduit separate from the electrical power leads if conduit is required by code. Open a second knockout in the bottom of the thermostat box. Feed the sensor (and conduit, if including) through the knock-out, down the wall cavity, through the opening in the bottom plate. Temporarily tape the sensor to the slab or subfloor in a location approximately 6” to 12” from the wall—final location of sensor after mat installation will be taped down at the edge of or in between two mats so that the sensor is not directly above a heating mat. Butt the sensor up against the side of the mat for best results. NOTE: The sensor is located in the thermostat packaging.
Step 7. Rough in the Wiring
Install appropriate electrical wire (conductor) from the power source and breaker protection to the thermostat following all codes. Leave 6” to 8” extra wire at the thermostat box.
Installing the Mats
Step 1. Inspect and Test Heating Mats
Verification that the heating mats were received in operable condition is important prior to installation. When the heating mats are removed from the shipping box, test the resistance using ohm meter and record the information. If the resistance reading varies more than ±3% from the recorded readings on each mat, do not install the mat and contact your supplier for assistance.
Step 2. Preparing the Stable Sub-floor
Clear the floor of all debris, nails, etc. so the floor is smooth, clean and dry.
Cutting & Customizing
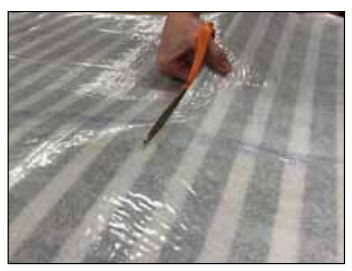
Step 1
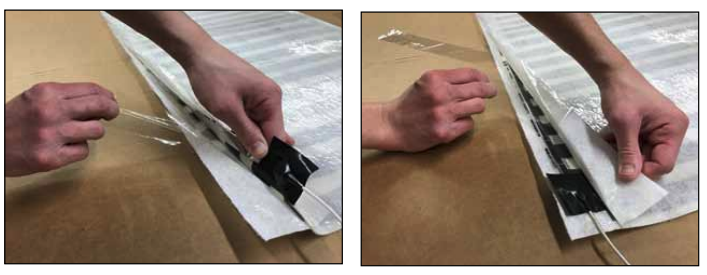
Cut the mat to the required length It is important to only cut BETWEEEN the Black Stripes. Do NOT cut into them as this will cause the GFCI to trip.
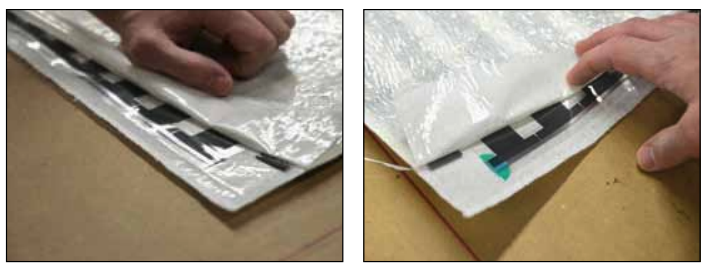
Step 2
Terminate the end with green insulating discs Cut back one black heat stripe from both ends of the panel making sure not to cut into black stripe. Fold one Kapton Insulating Disk, (Green dots supplied in kit) on the two silver bus bar endings on the panel on the opposite side from the thermostat location. Green insulating disk must be folded over the top and bottom of silver bus bar. Make sure the green kapton disk is covering the bus bar and the black ink area exactly as in the figure.
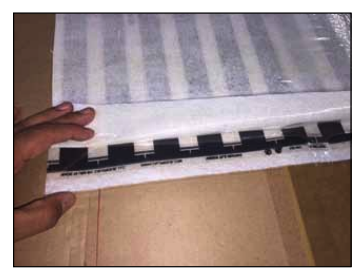
Step 3
*This step must be done regardless if you are cutting the mat or not. Otherwise it will lead to nuisance tripping of the GFCI and void the warranty.
Sealing the heater by removing the liners.
Fold back and crease the top “flap” on each end of the heating panel(s).
Peel back the bottom release liner on the inside of the flap and adhere the heating element by pressing down firmly.
Once the heating element is adhered to the bottom of the flap carefully peel back the upper release liner and press down to seal the edges of the membrane.
MAKE SURE TO PRESS OUT ANY AIR BUBBLES AS YOU ARE ADHERING THE TOP FLAP TO THE BOTTOM.
Proceed with the rest of the steps for installation on the following pages.
Check the resistance reading again to the new customized size.
Step 3. Laying the Mats
Connection leads from the mats are 15 feet long, and can be cut to desired length to connect at the junction box. The heating mats should be laid so the connection leads are running to the wall of the room where the thermostat/junction box is located. The following steps will guide in the installation of the mats:
1. With the release liner still on, position all the mats into place. Make sure the leads are within reach of the junction box and that there are no obstructions or floor penetrations in the way. Make sure the position of ALL mats is satisfactory before the next step.
2. When all the mats are in proper position, roll the end with the connections back far enough to peel back approximately 12” (30cm) of the release paper to expose a portion of the adhesive surface.
3. Press this exposed section of the mat onto the surface and then roll the other end back to the point where the release paper was removed.
4. Begin pulling the release liner off and hand smooth the mat into position as it unrolls to achieve a positive bond while avoiding trapping air bubbles.
5. For adjacent mats, follow the same procedure starting with alignment of the side by side mats in a butt joint fashion. Do not overlap mats.
6. Peel off quick release liner and set mat in place, leaving clearance to walls or partitions at the connector end for wiring and final connections.
7. Make sure to seal the flaps on each side of the mat(s). See page 10, Step 3 for directions.
Step 4. Install the Thermostat Sensor
As the mats are installed, locate the thermostat sensor probe. Sensor probe can be held in position with a small amount of tape. The sensor should extend approximately 6” to 12” from wall adjacent to the mat shown. Be careful not to locate the sensor near other heating sources such as a heating duct below the floor.
Step 5. Connect the Electrical Leads
Now, depending upon your wire lead installation, route the lead wires from each of the individual mat along the base of the wall and up to the junction box. Depending on the thickness of the mortar bed, you may also need to chisel a space under the point where the wires connect with the mat in order to recess the connection. Be extremely careful not to damage the heating mat or connection.
NOTE:
The thermostat sensor is thicker than the heating mat. If thin-setting over backer board or slab, saw a groove to recess the sensor to the level of the mat. Use duct tape to secure the sensor in the groove. Do not damage the sensor. Ensure the sensor is set down so it is level with the mat and not on top of the mat. Thermostat Sensor Sensor located 6-12” from wall
A visual and electrical check must be performed on the heating mats prior to activation.
Visual Inspection
Also perform a visual check to look for any signs of damage to the mat or electrical leads that may have occurred during installation. When visually checking the mats, look for any signs of damage, wear, or scratching that might have occurred during installation. If any portion of a mat appears damaged, replace the entire mat. If damage is found, call the technical hotline at 888-WARM-PAD or email [email protected] for advice and/or replacement assistance.
Continuity/Resistance Check
Following installation, a second resistance check across the supply leads of each mat using a digital ohm meter must be made to detect any short or open circuits that may have resulted from the installation process. If the resistance check is the same as the original reading shown on the mat label, the mat is installed properly and no further testing is required.
If the resistance readings are not within ±3% of the indicated value on the mat then call 888-WARM-PAD. If the resistance is ZERO: This indicates a short circuit. Check the path that the wiring is taking and make sure that no wires are pierced or otherwise damaged. Mats with damaged non heating leads must be replaced.
Test for Heating
1. Install control device and connect to electrical panel box. Install and wire the control device according to manufacturer’s instructions.
2. Wire the heating mat(s) to junction box, and wire the junction box to the thermostat according to the manufacturer’s instructions.
3. Turn on the breaker and adjust the thermostat so that it is calling for heat. Refer to the installation sheets provided with the controls for proper setting. After all controls are installed, do not energize the system, except to briefly test operation of all components.
4. After the system has been on for several minutes, run your hand over the heating mats to ensure that they are warm. The heat is a gentle heat and will only heat up slightly until the floor is installed. It will not get hot to the touch. Just a slight warm feeling. The system should now operate as designed. Please leave the instruction sheets for the thermostat in a safe place for future reference.
5. Once heating has been verified, turn off the system.
Final Floor Installation
The mats are now ready for tile installation using a latex modified thin-set with a maximum thickness of 3/8” after the tile is embedded. It is recommended to use a plastic notched trowel to help prevent damage to the heating mat surface. Take care during the troweling process to not nick or cut into the mat or cold lead wires. A continuous circuit monitor alarm can be used to alarm you if the cold lead wires have been cut during the installation. Damaged cold leads can lead to GFCI tripping issues and/or the mat not working. It is best to be sure you haven’t damaged the cold leads before the floor is installed.
We recommend working with professional flooring installers to make sure proper materials are used and proper installation techniques are followed. Install the floor covering according to the manufacturer’s instructions. Use a digital ohm meter to check the rsistance of the mat(s) and sensor(s) before, during and after the installation of the finished floor covering. Record the reading of QuietWarmth® Peel & Stick Radiant Heat on the Heating System Checklist & Warranty Registration Form, continuing to check for short circuits caused by nicks or pinches. If possible, take photographs of the mat installation before installing the flooring.
Tile, Stone, and Marble Installation
When installing QuietWarmth® Peel & Stick Radiant Heat under tile, stone, or marble, we highly recommend Tile Counil of North America (TCNA) guidelines or ANSI specifications for minimum standards of installation. We recommend latex-modified or epoxy modified mortar and grout, instead of water-based multi-purpose materials.
Use full coverage of thin set with no voids. Spot Bonding (Dot Mounting), and leaving large voids, is unacceptable and will lead to a crunching noise where the heat mats are installed. Thin set must be installed following TCNA/ ANSI standards. Spot bonding of tile that only gives partial contact leaving large voids is not an acceptable method for tile installed on floors with thin-set mortars.
Select the proper size PLASTIC trowel for the installation of tile or stone. We recommend a minimum 3/8” x 1/4” trowel. This trowel works best for most 1/4” tile.
If you need more information on tile installation, contact TCNA at (864) 646-8453 or visit their Web site at www.tileusa.com.
Join Our Newsletter
You are about to install your new flooring. As you lay the first plank you realize that
When installing new flooring, you want to make sure it last for years to come. With all flooring, moisture from the subfloor underneath (concrete) can cause issues and can cause headaches months from now.
Why and how is there moisture in concrete slabs?
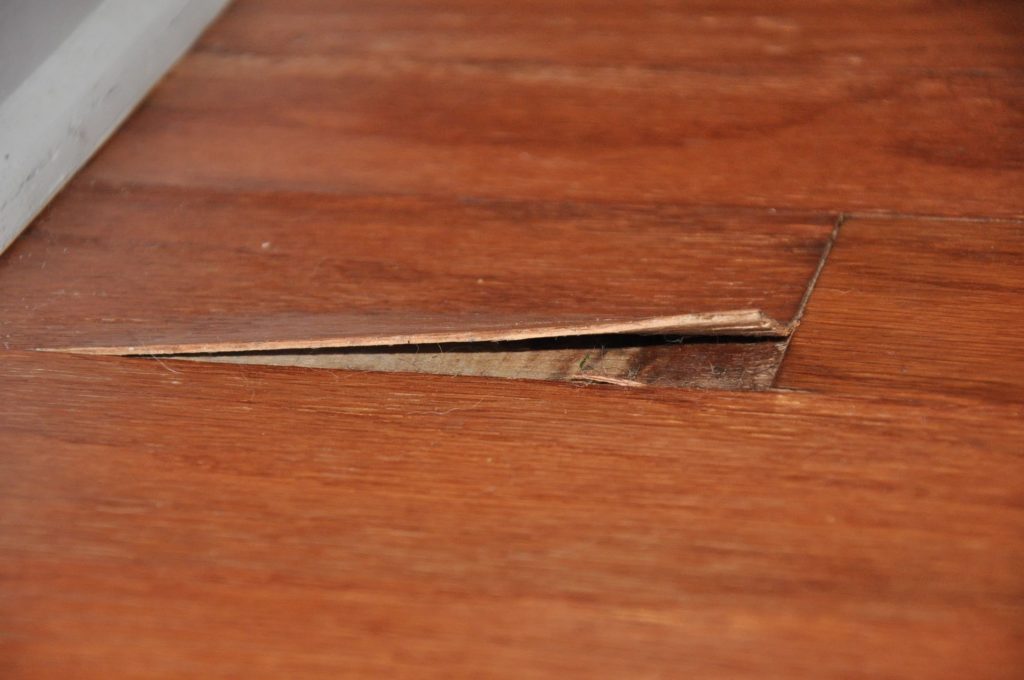
There is always water underneath the ground, while it might not be near the surface, it is there. Months or years from now the water table [link] might rise and the water will pass through concrete in water vapors with a capillary effect. Since concrete is porous, water vapors transmits from the ground through the concrete slab into your basement. Once the water vapors gather underneath your flooring, it will start to pool up and “soak” into your hardwood flooring. Once this happens, the flooring can buckle or warp and cause havoc.
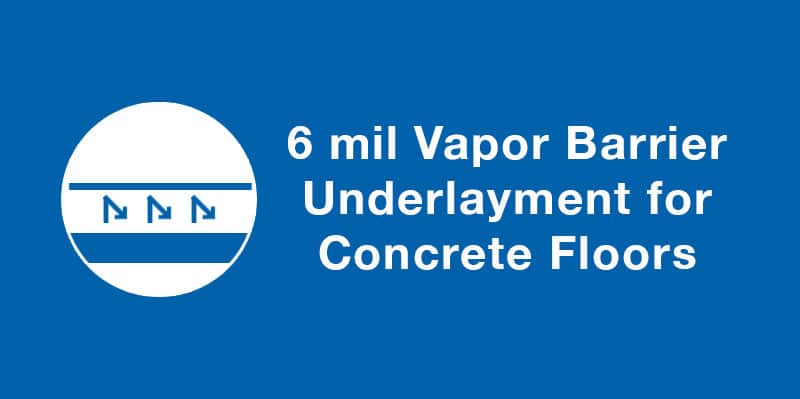
With a 6-mil vapor barrier underneath your flooring, the water vapor will gather underneath the film and no longer reach your beautiful flooring. No more worrying if your floor will have issues. So why do all flooring manufacturer installation instructions mention installing a 6-mil vapor barrier underlayment underneath? The reason is quite simple: A 6-mil vapor barrier blocks all moisture from the subfloor from ever reaching your flooring.
Vapor barriers come in two types
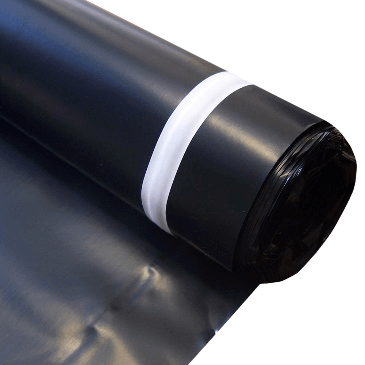
6-mil vapor barrier roll
Our MoistureBlock is a 6 mil polyethylene film vapor barrier that is used during the installation process with floating laminate, luxury vinyl planks and engineered wood floors. No need to bother with large fold-out, low quality, off-spec, construction grade films, which can be bothersome and hard to use before the floor is installed.
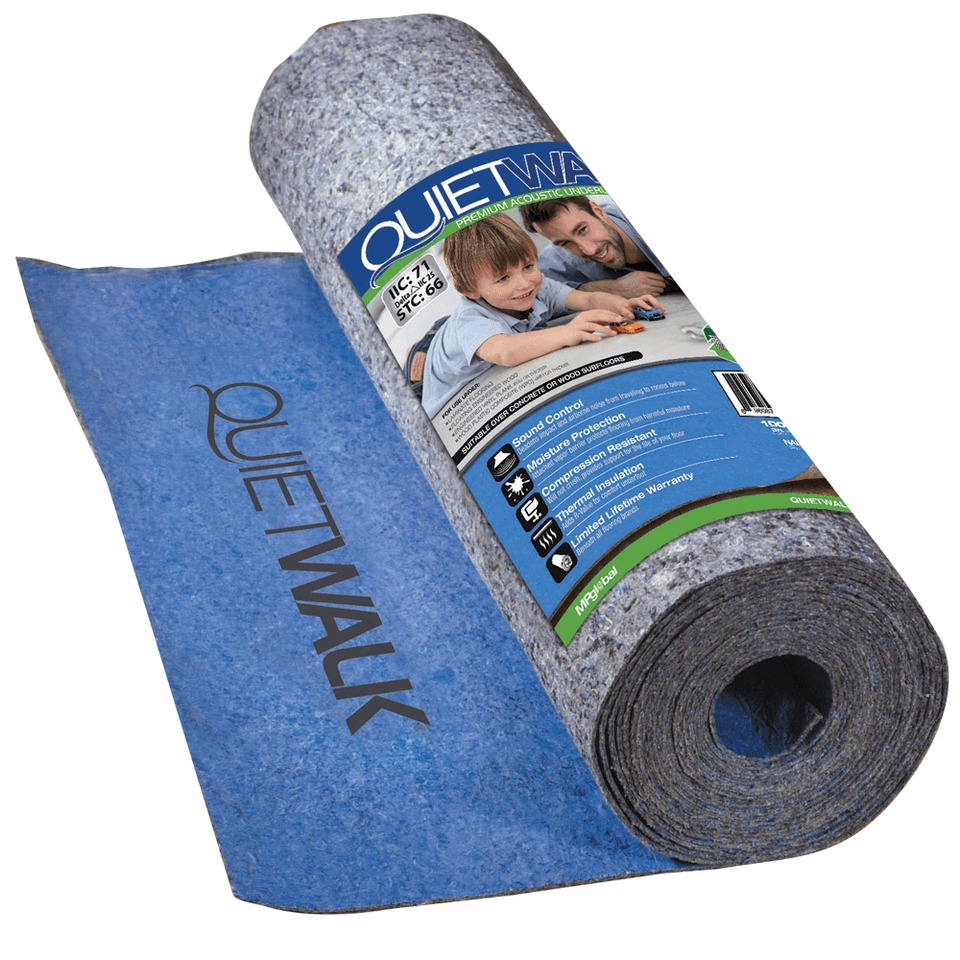
Underlayment with 6-mil Vapor Barrier
Some underlayment come with a built-in vapor barrier that also provides extra benefits such as:
Sound Absorption – Helps keep sound from reaching to other rooms
Moisture Protection – MP Global Products QuietWalk DriWick technology allows moisture to wick away from underneath while protecting your floor
Compression Resistance – Helps support the floor from high traffic areas and feel more comfort underfoot
Thermal Insulation – Helps break the coldness from concrete flooring
It also never hurts to install both MoistureBlock and underlayment together as this offers total protection from moisture.
Best 6 mil Vapor Barrier Underlayment by Flooring Type
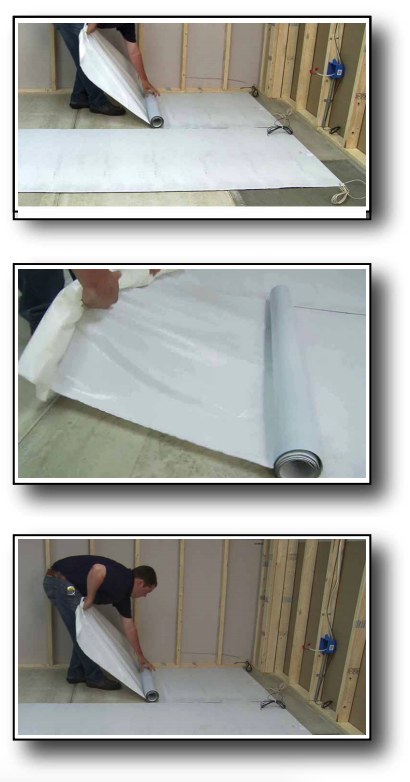
How to Install Vapor Barrier on Concrete Floor Under Laminate Flooring
Always read the flooring manufacturers recommendations and instructions before installing the underlayment.
Before rolling out the underlayment, be sure to sweep, vacuum, and remove all debris on the substructure.
Fill in any significant holes, gaps or breaks that may exist on the substructure.
Roll out the Underlayment over the substructure surface.
Leave roughly 2-3 inches along each side to overlap against the wall.
Splice each roll of underlayment with a 3 mil tape, duct tape, or similar pressure-sensitive tape that meets/exceeds the water vapor transmission ratings suggested by the flooring manufacturer.
If installing MoistureBlock Film Underlayment with Self-Sealing film edge, simply connect the rolls by removing the liner from the tape and adhere to the edge of the previous roll.
Always be sure to connect the film rolls together with the adhesive tape evenly so that there are no gaps between the adjoining rolls of film.
Once completed, you can trim up the excess vapor barrier
The rise of “tiny houses” have increased over the years which intrigues people to build simple, affordable tiny houses. If you however live in a colder part of the world and need to heat up your space, then radiant heating should be considered for your tiny house.
Why Electric Radiant Heating System?
Some of the benefits of using electric radiant heat instead of wood, propane and off-grid heaters are:.
No Visible Heating System – Thinner than a credit card, the QuietWarmth system can be installed under the floor. No mortar is needed for laminate and floating floors.
Cost Less To Heat – Using only a small amperage, electricity is used to allow the height to rise up from the floor up. Since heat rises, there is no cold air captured at the bottom.
Indoor Air Quality – Allows healthier atmosphere and doesn’t circulate dust or air pollutants.
Silent Operation & Maintenance Free – Since there is no moving parts to the system.
Fits Any Space – Cuttable to length and widths of 18″ and 36″ – these mats can fit in any tight space.
Simple Installation – Most DIY’ers can install this system by using our installation instructions and watching our YouTube video installations.
Our systems can be found in the following stores:
Join Our Newsletter
You are about to install your new flooring. As you lay the first plank you realize that
Flooring Underlayment for Flooring Contractors – Buy Bulk, Save Money and Increase Profit Margin
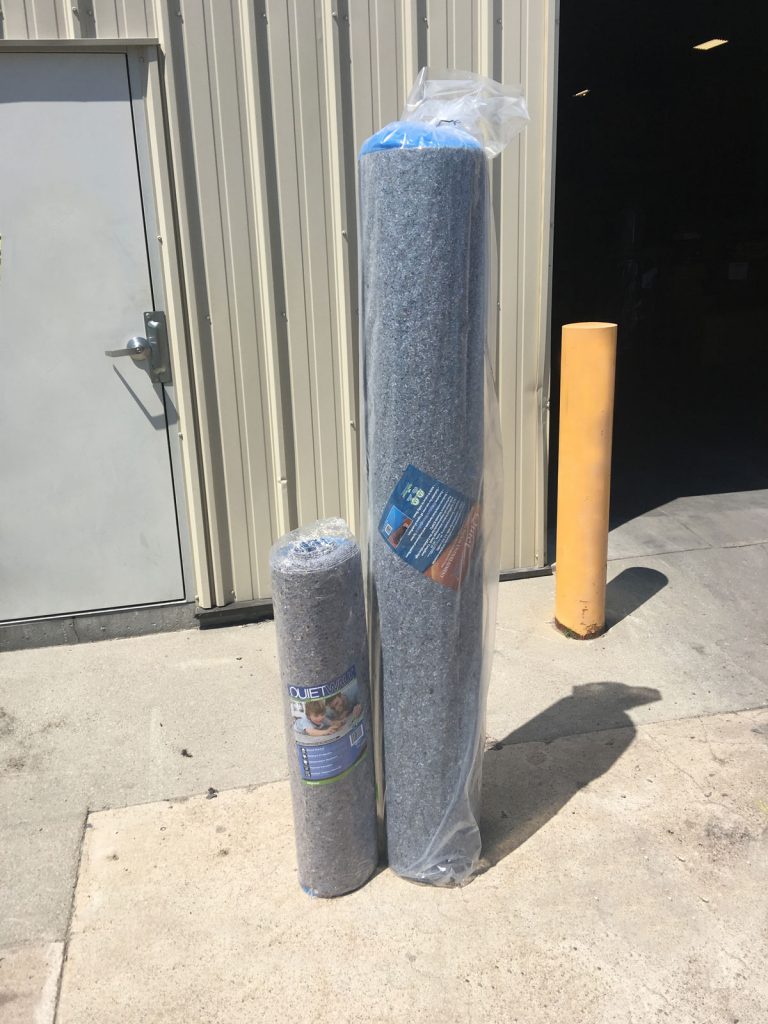
Most flooring contractors look for ways to increase their profits for flooring installations. One method of increasing profit is to buy underlayment in bulk. The following points describe the benefits of buying contractor rolls.
Less Trips To Store – This will allow you to go from job to job without gathering supplies
Less Seams To Tape – With the extra width the rolls come in, you won’t have to seal up so many seams
Faster Installation – You will be able to complete the job faster due to dealing with less rolls
Volume Discount – You buy at a cheaper rate due to bulk size. You get more bang for your buck
Reduce Storage Space With Fewer Rolls – Rolls come in 6′ x 60″ roll, meaning less qty of rolls to carry
With the new addition of QuietWalk Plus, our customers are wondering what the difference between QuietWalk and QuietWalk Plus.
The main benefits for QuietWalk Plus is:
Enhanced film – The film allows the glue to adhere to the floor and subfloor. It is malleable to allow nail down flooring.
More Dense Pad – The pad is more dense which is to properly support nail down applications
It was also created to consolidate sku’s and allow contractors/flooring installers to inventory one underlayment that would cover floating, glue or nail-down flooring applications.
QuietWalk and QuietWalk Plus has the same acoustical benefits.
Buying your ideal flooring can be an exciting experience. With pricing of $2 – $8 per sq ft, you want to make sure you install your flooring the correct way. Maybe you heard of horror stories of people installing laminate flooring and hear cracking sounds when walked on. What lies underneath the flooring can determine how the flooring will react and sound in your home.
The following 7 items should be considered in an underlayment when you are installing your new flooring.
1. Compression – Provides Support and Impact Resistance
Underlayment compression is a key factor as heavy traffic areas can cause enough weight to “compress” your underlayment over time. So support can be temporary. So how do underlayments past testing for compression? By compression set testing.
Compression set testing is used to determine the ability of elastomeric materials to maintain elastic properties after prolonged compressive stress. The test measures the somewhat permanent deformation of the specimen after it has been exposed to compressive stress for a set time period.
The underlayment height is measured before the test. A clamp is held down for 12 hours on the underlayment and released. After waiting for another 22 hours, the measured height of the underlayment is taken.
Compression Set Test Results
Fiber/Felt Underlayment – QuietWalk rebounded 78% of its height
Foam Underlayment – 59% rebounded
Fanfold Underlayment – No Rebound At All
During installation, knee pads or work shoes sometimes crush the underlayment and not rebound back. Making a drum sound when walking on the floor after installation.
Depending on the material the underlayment determines how much support is given.
Foam Underlayment
Consist of trapped air. If you can squeeze the underlayment and hear popping noise, then air is being released. Sometimes, you can hear the pop due to high traffic or appliances being rolled over the flooring. Once the air is crushed, it is gone.
Fiber Underlayment
Consist of recycled material, the underlayment is densier in material. No trapped air that won’t be released. Fiber/felt underlayment offers superior compression and sound absorption.
2. Moisture Protection
One of the other main benefits of using underlayment is moisture protection. Keeping your flooring from getting wet and stop from warping. Some underlayment consist of a vapor barrier built in.
Most products have the moisture vapor barrier facing down. This essentially allows the pooling/vapors to be trapped below the vapor. With our underlayment – our vapor barrier is facing up, and installing the fiber ½” to 1” from the wall. This creates a gutter system to allow the moisture to evaporate around the perimeter of the room.
So when a pipe leaks such as a washing machine, fibers will pull moisture in and away from the floor. This allows the floor to manage the moisture instead of blocking the water. This distributes the water out evenly.
3. Sound Absorption – Buffers Ambient and Impact Sound
Our fibers are laid out a certain way to simulate small air gaps without limiting compression capabilities. Also the various amounts of recycled materials used provides inherited properties of sound absorption.
Sound Testing Assembly
The ratings you see from flooring underlayment manufacturers are based off of assembly testing. This means that some floor to ceiling test consist of open web truss floor to 6” concrete slab.
You can get your rating number by first knowing what your assembly is. If you know your assembly or close to it, you can find sound rating test matched with the underlayment you are choosing. Sometimes, you will not find the rating for your assembly due to various assembly types built. Each test cost thousands of dollars and getting each assembly would not make sense due to every variance of assembly.
Over 94% of recycled material is used in our fiber/felt underlayment. We are also SCS certified and Indoor Advantage Gold as a contributor to healthy indoor air quality. The highest award a company can get. No off gassing, no voc, no allergens which clears the way to be used in schools, governments and hospitals.
5. Ease of Installation
One of the main factors to consider is the ease of installation. Can you roll out the underlayment very easily? Or is it rolled backwards and consist of you unrolling the roll manually across the floor? With our fiber underlayments, we engineered the roll to be rolled across making it a time saving activity for flooring installers.
6. Insulation Value – Thermal Properties
Our recycled materials come from used garments which have some insulation ratings. Mixed with various materials, we can achieve higher thermal ratings compared to one material such as foam.
7. Smooths out minor subfloor imperfections
Roughly 1/8th inch thickness and the density of the fibers are perfect to absorb small pebbles that protrude from slightly rough concrete finish or slight variance of OSB or plywood joints. Provides nice smooth installation.
Join Our Newsletter
You are about to install your new flooring. As you lay the first plank you realize that


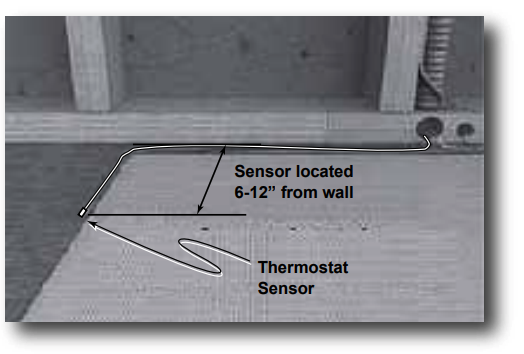 As the mats are installed, locate the thermostat sensor probe. Sensor probe can be held in position with a small amount of tape. The sensor should extend approximately 6” to 12” from wall adjacent to the mat shown. Be careful not to locate the sensor near other heating sources such as a heating duct below the floor.