QuietBoard Underlayment is designed for use with floating vinyl plank, laminate, and engineered wood flooring products. The sound reduction underlay system is easy to install and is suitable for use over most types of industry-approved subfloors (3/4” plywood, concrete, OSB flooring, etc.).
Subfloor Preparation
All wood and concrete subfloors must be flat within 1/8” over a 6’ span, or 3/16” over a 10’ span. All seams of QuietBoard must meet this requirement as well. Be sure the subfloor is clean, smooth, and free of dust and debris. All areas must be checked prior to installation.
Installations by method
Floating Installation:
QuietBoard can only be floated when paired with a 4mm or thicker floating floor covering.
Begin laying panels of QuietBoard perpendicular to the flooring direction, butting them tightly
Panels need to be staggered at approximately 50%, eliminating a grid-style layout
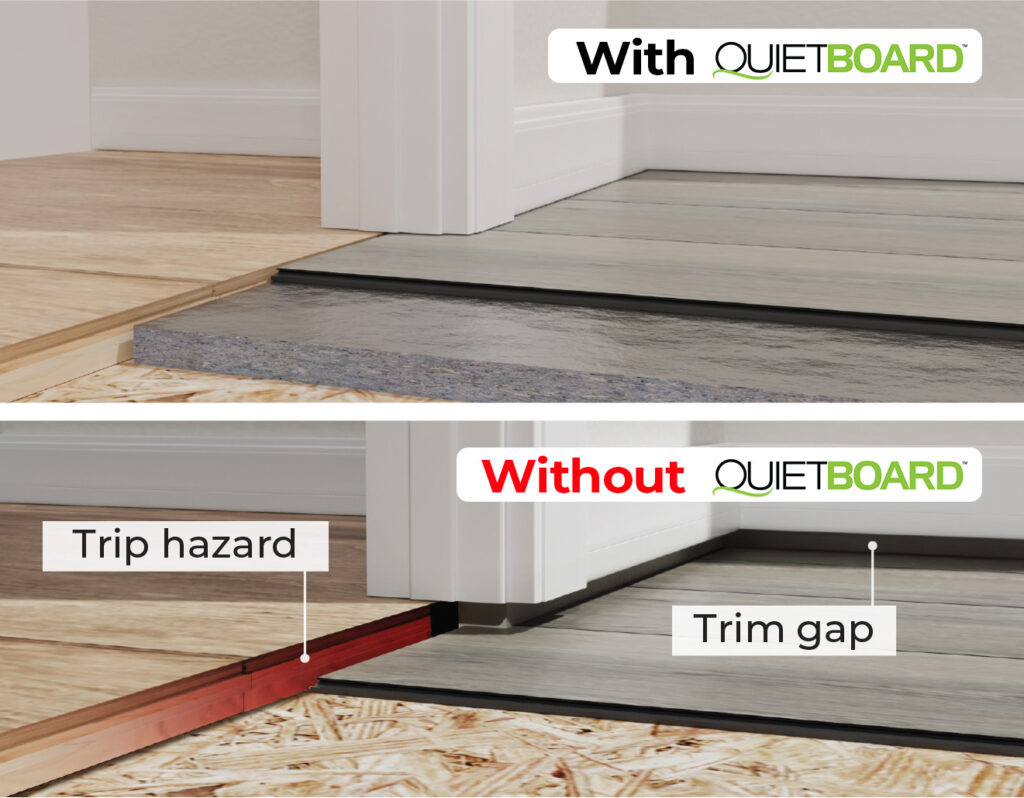
1/4″ Expansion gap is to be left at all perimeter walls
All continuous/linear seams must be taped using quality duct tape, a minimum of 2 inches wide
Install flooring perpendicular to QuietBoard according to the flooring manufacturers.
Glue Down Installation:
Glue down installation is required for planks less than 4mm thick
Begin by troweling a good quality pressure-sensitive adhesive using the recommended trowel size from the adhesive manufacturer
Lay panels of QuietBoard perpendicular to flooring direction, butting them tightly
QuietBoard panels are to be installed while the adhesive is still wet.
QuietBoard panels need to be rolled with a 75lb-100lb roller to ensure a full bond is made.
Panels need to be staggered at approximately 50% eliminating a grid-style layout
¼” Expansion gap is to be left at all perimeter walls
All seams need to be properly prepared in accordance with the flooring manufacturer’s recommendations. Failure to properly prepare seams will void all warranty.
We do not recommend taping seams in glue-down installation.
Install flooring perpendicular to QuietBoard according to the manufacturer’s specifications
Running into an uneven floor is frustrating, this can lead to unexpected costs, in both time and money. If you want to raise the height of a floor, the cheapest and easiest way is to add a thick underlayment designed for the job. There are other options too like adding a framed wooden subfloor or floor leveling compound before installing new flooring. These are less common due to the fact that they are more labor-intensive and time-consuming.
Why Raise Floor Height?
There are many reasons for raising floor height. You might want to raise the floor height so it meets flush with another room. This will make it easier for people to get around, especially if they have mobility issues or are carrying something heavy.
You are replacing an old flooring material (like laminate) with a new one that is thinner (like luxury vinyl planks). The luxury vinyl planks won’t be as thick and will leave a gap between the flooring and the baseboards. Depending on how you choose to raise the floor height, you can gain extra benefits from the materials used.
5 Cheap Options for Raising Floor Height
Here are the 5 cheap options for raising floor height. Let’s take a closer look at each one.
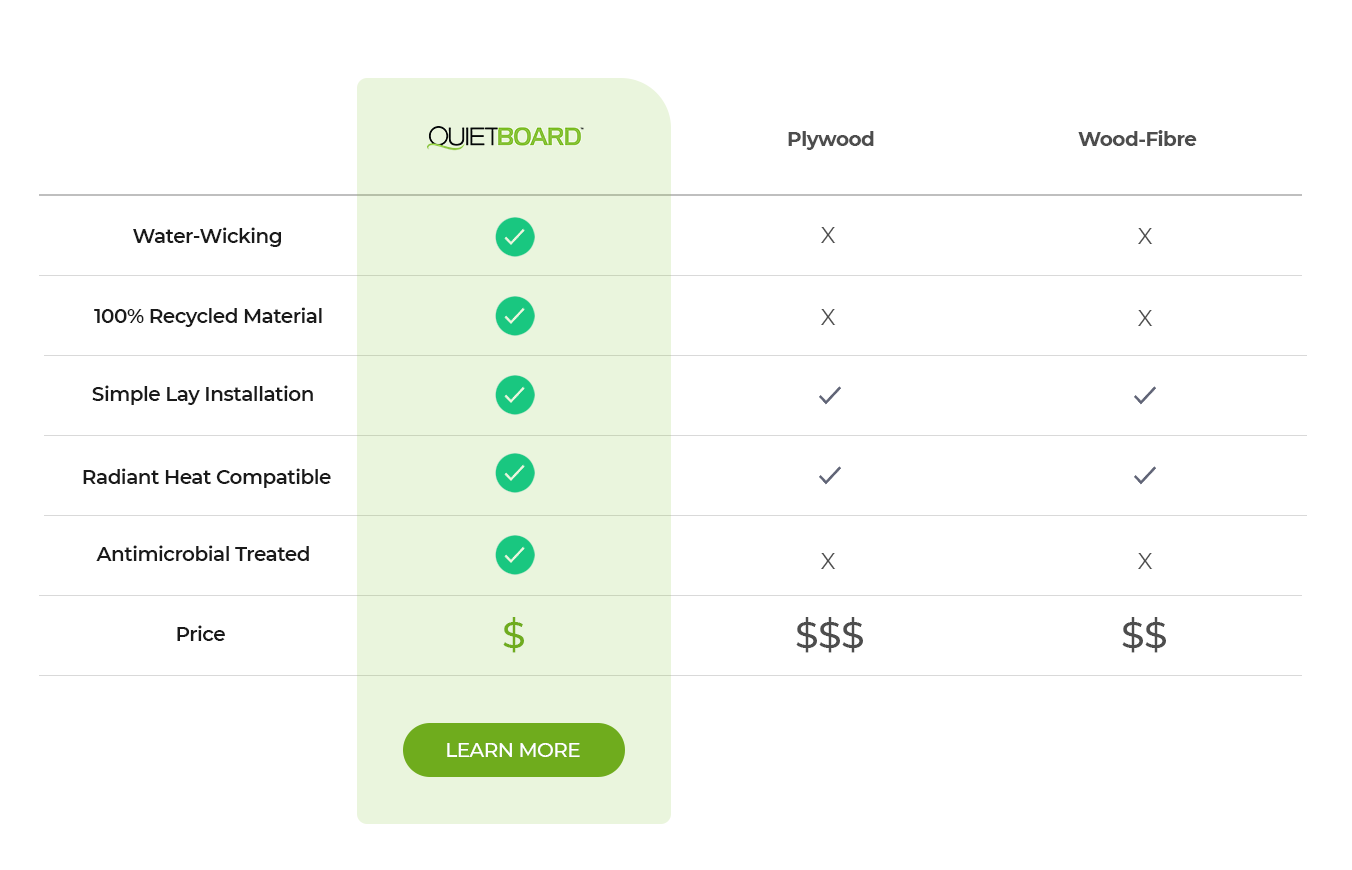
QuietBoard is a specially formulated fiberboard underlayment that makes raising your flooring cheap and easy. It is made in the USA from 100% recycled fibers and has no volatile organic compounds (VOCs) or other harmful emissions. Simply layout the boards and tape the seams.
Not only will QuietBoard raise the floor height, but will give your new flooring other benefits as well. The dense fibers will reduce noise, support your flooring, and absorb moisture.
Pros
Cheap
Easy to Install (can be floated, glued, or mechanically fastened)
Recycled Fibers absorb water and let moisture evaporate
Compatible with float or glue-down flooring installations
Easy to uninstall and go back to the original floor height
Cons
Only comes in 1/4″ (6mm) thickness
Wood Fiber Board
Wood fiberboard is one of the most affordable ways to raise floor height. It’s also a good choice if you’re looking for a low-cost alternative to plywood.
Wood fiberboard consists of sawdust and wood chips held together with synthetic resin. When compared to plywood, wood fiberboard lacks compression resistance and moisture resistance. That said, if you’re putting in new floors for your whole house and want something fast and inexpensive enough that you don’t mind replacing them every few years or so if they get damaged or destroyed by water damage, wood fiberboard may be worth considering as an option!
Pros
Cheap
Easy to install
Cons
susceptible to water damage
can be dusty & messy during the installation
Floor Leveling Compound
Using a floor leveling compound to elevate the floor in a specific room and make it match the rest of the house is a low-cost option. This approach is popular among homeowners since it works when applied straight to concrete. If your project is not on a concrete subfloor, this method may not be the best option.
You can purchase a floor leveling compound online or at your local home improvement store. The installation method is usually simple once you’ve purchased it. The steps are listed below:
Start by sketching out the height you want to achieve. Consider all factors, including the type of flooring you have.
Clean the Floor: Clean the floor thoroughly to eliminate all debris and grease and to guarantee that the compound adheres.
In an 18.92-liter (5-gallon) bucket, combine the leveling compound with water. Attach a paddle mixer to a drill for a flawless and constant mix.
To apply the compound, follow these steps: Directly on the floor, apply the leveling compound (from one corner to another). Make sure you complete the process within 10 to 20-minutes.
More compound: Make sure you mix and apply the compound until the desired height is reached. Allow about 24 hours for the compound to set and cure. You can now install the chosen material after it has completely cured.
Pros
Cheap
Durable
Cons
Difficult to install in larger quantities
Cannot go back to the original floor height
Only works well on concrete
Deck Mud
When tiles are used on the surface, this method works well. To begin, get sufficient deck mud for the endeavor. After that, proceed as follows:
Clean the floor: It doesn’t have to be spotless; just make sure it’s safe to work on.
Layout chicken wire across the floor
Pour the mud on the floor: Fill the floor with deck mud (to the center from one side of the room and again to the center from the other side of the room).
Use a compactor and a level to ensure the mud is compact and level.
Pros
Cheap
Cons
Difficult to install in larger quantities
Cannot go back to the original floor height
Framed Wooden Subfloor
If you’re handy, measuring the height deficit and constructing a wooden base that is the right height is another option. When constructing the wooden base, measurements are crucial. For example, you will have to consider the height of the frame, the height of the plywood you will lay over the frame, and the height of the flooring. Once the measurements are made and the base is constructed, it should be covered with 3/4in plywood. With the cost of wood and the woodwork needed, this is the most expensive and time-consuming of the methods.
Pros
Can fill a variety of different heights needed.
Cons
Difficult installation
More expensive option
Final Thoughts
Raising the floor height in your home doesn’t have to be a costly process. Depending on your unique flooring needs, you can choose any of the methods listed above. In most cases, we recommend choosing QuietBoard fiberboard underlayment. It is cost-effective, easy to install, and doesn’t lock you into your new flooring height. It also performs like a quality underlayment, reducing noise, providing support, and absorbing moisture from the subfloor below.
If you have questions about your flooring needs, feel free to call us at (888) 379-9695 as we have been specializing in eco-friendly flooring solutions for over 30 years!
QuietBoard vs. Other Options
Join Our Newsletter
You are about to install your new flooring. As you lay the first plank you realize that
The subfloor must be clean and dry. It is important to have all dust and debris cleaned off the subfloor before adhering the QuietWarmth tile mat.
Dry fit the mats before adhering them to ensure they will fit to a planning diagram that you would have planned out way before this step. This will ensure lead wires will run correctly to the junction box.
Once the mats are in the proper position, roll the end with the connections back far enough to peel back approximately 12” of the release paper to expose a portion of the adhesive surface. Press this exposed section of the mat onto the surface and then roll the other end back to the point where the release paper was removed.
Begin pulling the release liner off and hand smooth the mat into position as it unrolls to achieve a positive bond while avoiding trapping air bubbles.
For adjacent mats, follow the same procedure starting with alignment of the side-by-side mats in a butt joint fashion. Do not overlap any mats.
Once you have the mats in their permanent place, a licensed electrician can help you make the final power connections.